Boots, Blowouts, and Boost Tubes: How to Build a Reliable CAC Piping System
So, let’s talk boots! No, were not talking about Red Wings, steel toes, or Timberlands. This article is about ensuring that your charge-air cooler boots remain intact and in place to keep your car or truck on the road and out of the garage. So what’s the big deal? You clamp the boot down, and if it blows off you clamp it a bit tighter. While this might be a quick solution, that boot blowout is likely to occur again unless you address the issue properly. If you have a modified car or truck that produces an absurd amount of boost, pay close attention to this article for tips about selecting the right products for the job and creating a reliable system. No one wants to be left on the side of the road in frigid weather when a cheap boot decides to commit suicide. Okay, let’s jump right in!
Charge-Air Cooler Basics
This section is for those who are completely new to turbocharged vehicles. If you have a basic understanding of the intercooler kit on your vehicle, please feel free to skip ahead to the next section.
Let’s start by explaining these terms: intercooler and charge-air cooler (CAC). These terms are used interchangeably for the system that cools the airflow moving from the turbocharger to the intake manifold.
Why would you need an intercooler on your turbocharged vehicle? That one is simple. Air coming from your turbocharger compressor housing is normally at a very high temperature that varies depending on turbocharger size, style, and boost pressure. Our various tests have shown outlet temperatures in the neighborhood of 250°F (121°C). Pumping air at this temperature into your engine is not a great idea. As we know, engines prefer a cooler air charge. The lower the temperature, the greater the density of the charge of air, meaning it contains more oxygen per volume. This greater density (oxygen) will provide a more efficient combustion process that will create more power, better fuel economy, and be less prone to detonation. On a modern forced-induction vehicle, an intercooler is a must. In the early days of stock turbo charging, some vehicle models were not equipped with an intercooler system. Over time, manufacturers were exposed to the necessity of this system, and it is now commonplace.
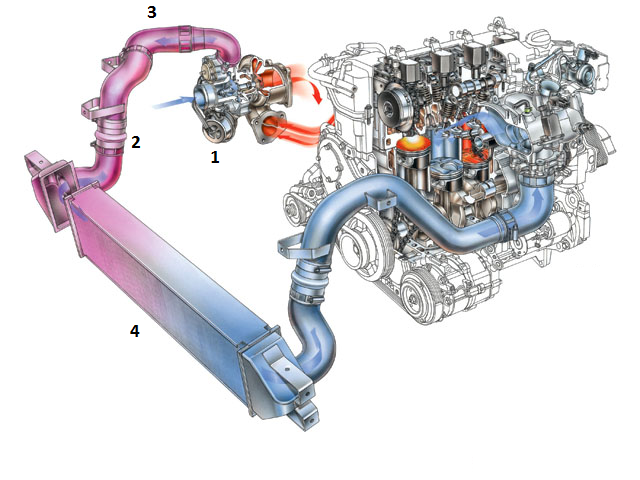
So, what components should we be aware of in an intercooler system? We will be highlighting and referencing the five major components in this article.

Turbocharger system diagram
1. Turbocharger Compressor Housing

Turbocharger example
This is the component that starts everything. The compressor side (often referred to as the cold side) of the turbocharger sucks in ambient air and uses an impeller to compress the air and force it around the housing and into the piping. The shaft of the impeller runs the entire length of the turbocharger. The opposite end features another impeller that is spun by exhaust gases.
A typical turbocharger has a bead-rolled, pipe-style outlet connected to the piping via a boot of some sort. A few stock turbochargers feature a flange that mates to a specific pipe.
The turbocharger heats and compresses the air; the other components (below) must then cool down that air.
2. CAC Boots
The boots create all the connection points in your system. These components are the most failure-prone parts, and as we know, a system is only as good as its weakest link. Boots link the piping to the turbocharger, to the intercooler, and to the throttle- body/intake manifold. These units are in place to allow for engine movement, and they work to absorb this shock. If the system were solid and without flex, the turbocharger would move, which would result in bending or cracking of the piping or the intercooler itself. Additionally, the boots provide connection points to separate the components, allowing for individual servicing.
3. CAC Piping
The piping on this system routes the airflow from the turbocharger through to the rest of the system. It is normally composed of bent steel tubing or plastic piping. Most aftermarket offerings select aluminum piping for its lower weight compared to steel, as well as its heat dissipation properties. Pipe diameter can be enlarged to increase flow, which is common with the kits offered by Mishimoto. We also utilize mandrel bent aluminum to provide the smoothest possible flow.
4. Intercooler

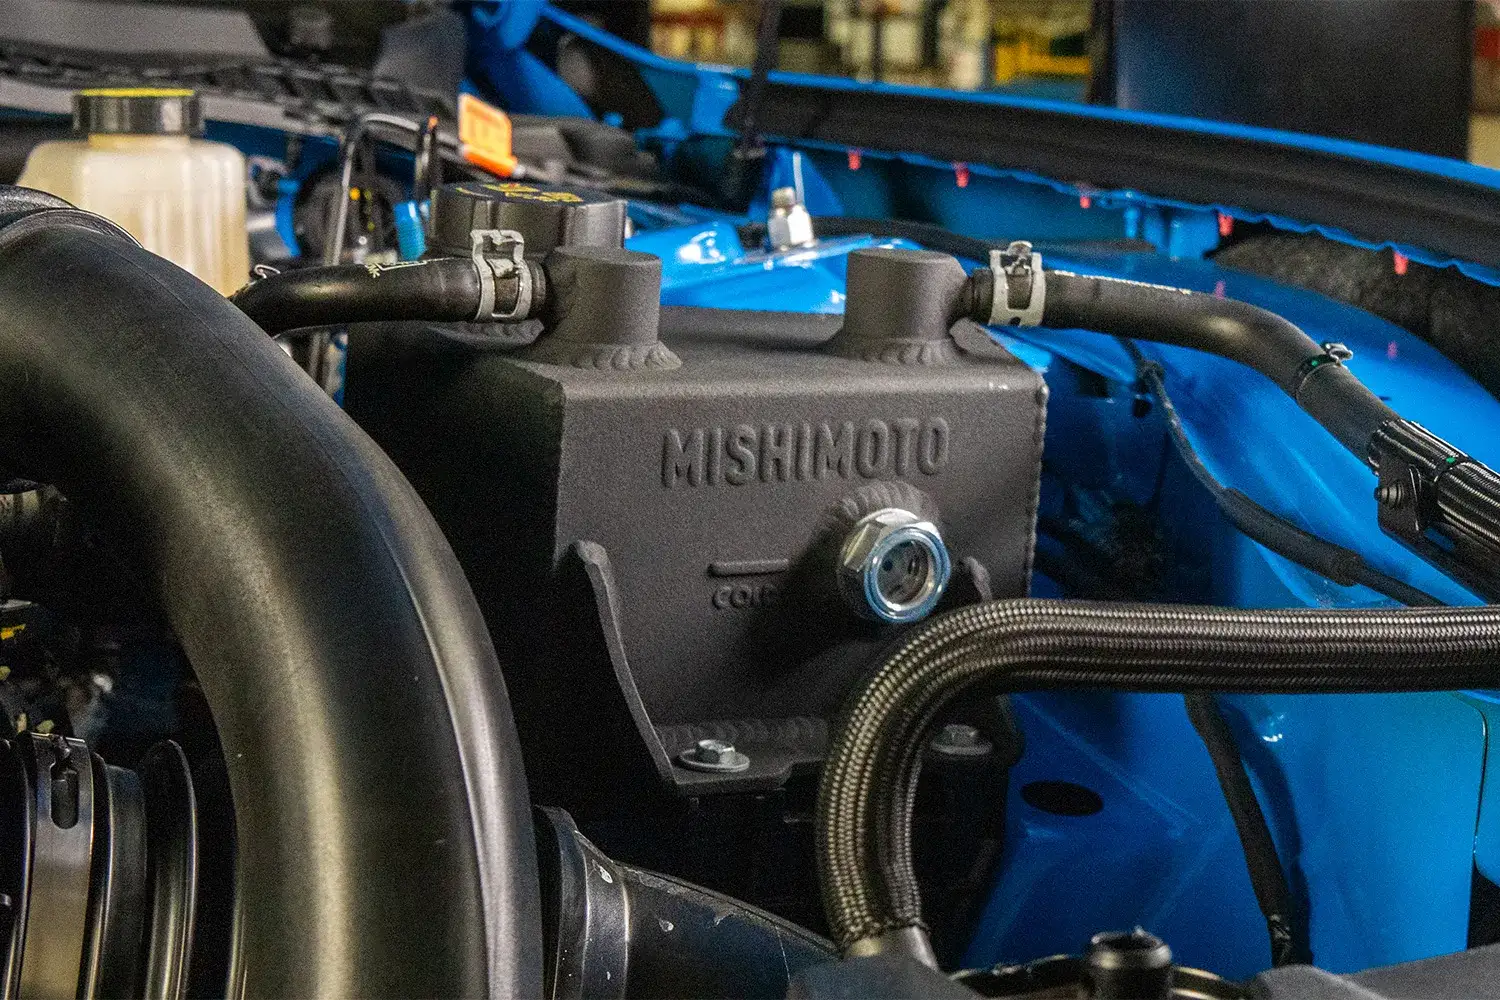
Mishimoto 6.7L Cummins intercooler
The intercooler is the component in the system that does all the work. An intercooler, or charge-air cooler, is an air-to-air heat exchanger that cools the internal airflow by using air moving through external fins. Intercooler core design can vary significantly, but two main core types exist. A tube-and-fin design is more commonly equipped on vehicles from the factory due to its light weight and lower expense. These coolers are composed of internal tubes separated by external fins. Aftermarket race intercoolers generally feature a bar-and-plate core that is heavier yet more efficient for heat transfer. These coolers are constructed with a series of bars and plates to create an internal area for airflow. These components are then attached directly to external fins that work to transfer heat from the internal air. A typical performance upgrade would move to a larger-volume bar-and-plate core, which will improve the transfer of heat, thereby lowering intake temperatures. The intercooler is installed between the turbocharger and engine, as shown in the diagram above.
5. Bypass Valve
Lastly we have our bypass valve, which is not labeled on the diagram above. This component is nearly always found on modern CAC systems, its primary function being to reduce compressor surge when the throttle is closed (during shifts). This allows pressure to vent into the atmosphere instead of building up in the system. Compressor surge occurs when air pressure after the housing is higher than what the unit itself can maintain. At times, this can result in a compressor stall and even turbocharger bearing failure. The bypass valve is important, as it opens up during these high-pressure instances to decrease pressure and keep the turbocharger properly in boost. This component can be found mounted to the intake piping, with a vacuum line running to the engine.
What a Leak Can Do To Your Vehicle
So, why should you be concerned with a leaking CAC system? A leak in the CAC system will result in a loss of pressure, which will affect power output and reduce fuel mileage. A small, undetected CAC leak could go unnoticed for some time, costing gallons of fuel. A pinhole leak or split boot is a ticking time bomb for your car or truck. That small leak is prone to spreading, resulting in the complete rupture of a boot. Any form of boot failure is going to cost you money one way or the other, money that could have been better spent on upgrades!
You should also consider the long-term effects of running your vehicle with a leaking system. First, would be turbocharger wear or failure. The engine still expects a particular amount of boost, regardless of any leaks within the system. If the leak is cutting boost, the turbocharger will be forced to work harder to produce the necessary amount. This will increase wear on internal bearings, and will also introduce greater heat into both the CAC and coolant systems. This is not something you want. A simple $100 boot kit replacement could prevent thousands of dollars being spent on parts and labor to repair the damage.
So how do you find leaks in your system? Some leaks may be difficult to detect, especially if they have been present for quite a while. You should perform an initial inspection to check all the boots in your system for wear and splits. Flex each boot in your hand and check for any damage in the bends. Also check for any rubbing damage incurred by other engine bay components.

Rubbed intercooler boot
If no leaks are found, check all clamps to ensure they are tight and secure. Finally, a CAC boost leak tester can be used to provide confirmation of proper sealing of your system. Most shops should have this tool. Check with your buddies; maybe you can borrow a set in exchange for a case of beer (okay, maybe a six-pack!). Or, you could purchase a test kit and become that friend who everyone steals tools from. Check online for DIY boost leak testers. A bunch of awesome build guides exist that utilize components found in any hardware store, saving you quite a bit of money.
The basic function of these kits is simple. The system is capped from both ends and the piping, boots, and cooler are exposed to a specific air pressure. Once filled, it is easy to see the pressure quickly drop if a leak exists in the system. A small loss in pressure over a longer period of time is normally acceptable.
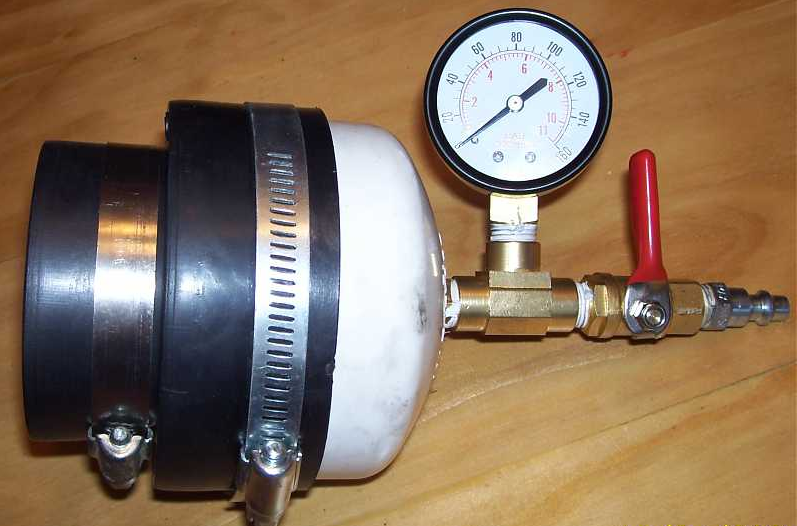
DIY boost leak tester
With all of this in mind, if you have any doubt in your CAC system, take the time to perform an adequate inspection and test of the system. If anything, your peace of mind is certainly worth it.
Pipe Preparation
Although less common than a boot failure, issues with piping can cause a nightmare when trying to seal your CAC system. The primary sealer on intercooler pipes is the bead roll, a raised portion on the end of the pipe, which creates a location for a clamp to properly secure the boot. A very low-boost application might not have a bead; however, any measurable pressure is likely to separate the boot from the pipe. All stock boost tubes will have some form of a bead roll. Some manufacturers include a groove in the middle of the bead to function with a specific boot. Either way, an intact bead roll is key for creating a solid connection between the pipe and coupler.

Bead roll examples
As you can see, bead rolls can differ slightly but they all serve the same purpose. Our team has produced numerous stock-style boot kits that emulate the stock bead roll.
A majority of stock intercooler piping is constructed from steel piping. Mishimoto offers aluminum intercooler piping, mostly because of the improved heat-transfer properties associated with the material. A failure in a stock steel boost tube is uncommon but is certainly possible. Failures are commonly associated with the pipe rubbing on another engine bay component, which would lead to an eventual rupture of the pipe wall
Newer vehicles are equipped with more and more plastic components in the engine bay. While this saves weight (and likely money), it also provides yet another compromise. A few newer trucks are using plastic CAC piping (Powerstroke 6.7L, Duramax 6.6L), primarily on the cold side of the system. As we’ve seen with the use of plastic on engine cooling systems, the repetitive oscillation effects of temperature and pressure can degrade the plastic, leading to an eventual failure. Diesel intercooler cold-side piping is not usually exposed to such high temperatures as a radiator would be; however, it will still see a great deal of pressure, especially if the truck has been modified. We are already beginning to see failures of these plastic pipes, and we are working diligently on an aluminum solution (6.7L Powerstroke already released!).
Installing new boots on your existing intercooler pipe seems like a simple task, but many installers forget one important step, cleaning the pipe. The CAC system on your car or truck is not a perfectly clean pathway. Blow-by oil and fuel byproducts make their way into the track, coating the internals of the pipes, boots, and intercooler. Often this oil can make its way underneath your boot, coating the sealing surface of your pipe. When installing a new boot, be sure to clean the surface with some form of solvent. Be certain that no oil residue exists on the sealing surface. If you are having issues installing a very tight boot, a few home products can come in handy. Spray the surface with hair spray and try to slide the boot on the pipe. The spray will be slick and then dry once installed. You could also use a small amount of dish soap, which will also make the surface slick during install and then tack up when dry.
Boot Contamination and Breakdown
Now that we’ve covered the pipes, we can move onto the main culprit for leak issues: the CAC boots and couplers. So why do these units fail? They should last forever, right? For a period of time, manufacturers were including EPDM rubber boots on their CAC systems. Rubber is inexpensive, and provides the flex needed for movement within the CAC system. That being said, there are far better materials to use for boot construction, as we at Mishimoto have found.
Three primary factors weigh into the wear that will lead to eventual boot failure.
Temperature
EPDM rubber is generally well-known for its heat, ozone, and weather resistance properties. Most rubbers of this type have a maximum operating temperature right around 300°F (149°C), which is fairly close to what the hot-side of your CAC system will see. For instance, the hot-side intercooler boot on our 2010 Dodge 6.7L Cummins saw upwards of 260°F (128°C). While not exceeding the limits, this is getting pretty close to the recommended operation temperature. Repeated variation of temperature will also play a role in degrading the rubber over time.
Oil and Fuel Byproducts
The effects of fuel and oil on rubber CAC boots are quite significant. EPDM rubber has poor resistance to petroleum-based products. If you are lucky, you should not have any of these fluids in your intercooler system, right? Wrong. The internal parts of your piping and cooler are likely coated in a thin (or perhaps thick) layer of oil. How does this happen? Check out the quick and dirty explanation below.

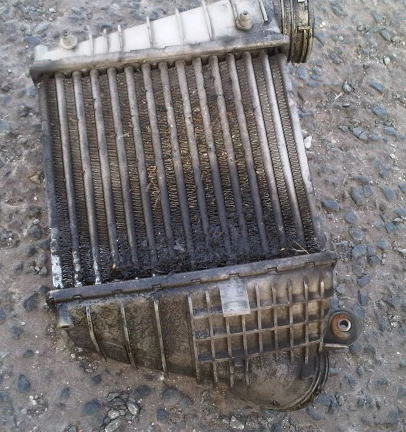
Example of oil in an intercooler boot

Example of oil in an intercooler core
The primary reason for oil in your intercooler system is the PCV/CCV systems on your engine. Without going into too much detail, your engine features a CCV (crankcase ventilation) system that works to improve engine efficiency and emissions. During engine operation the crankcase generates pressure from the combustion gases passing the piston rings. This pressure is evacuated from the crankcase and is routed into the intake system to be burned in the combustion process. When the oil enters the intake, it coats the tract, piping, intercooler, throttle body, and valves. It is then burned in the combustion chamber, lowering the octane of the mixture. Although not optimal for performance, this does create a clean engine that requires no emptying of byproducts and contaminants. Ideally, these contaminants should be separated, collected, and disposed of, which can be done easily with the use of a catch can system. A catch can separates the oil and fuel byproducts from the air, captures it in a can, and allows for removal of these contaminants before they affect your CAC system.
Mishimoto offers several different oil catch cans with varying sizes, shapes, fittings, and features. We have also been working to develop numerous direct-fit kits, which helps our customers take the guess work out of installing a catch can. Check out the Mishimoto universal oil catch can if you aren't sure what is right for you
Oil seals are also potential causes of blow-by oil in your CAC system. If the compressor housing seal on your turbocharger is compromised in any way, oil can make its way into the cold side of your turbocharger, thereby moving into the intake tract. This accumulation is usually a bit more prominent and more easily identifiable by the trail of smoke following your vehicle everywhere.
So, it is extremely likely that your vehicle’s CAC system has a nice coating of petroleum-based fluid. Exactly what will cause rapid degradation of your rubber boots? Degradation will compromise the integrity of your boot, especially when under pressure.
Pressure
Pressure is another factor that affects the lifespan of your intercooler boots, and it is normally the element that presents itself during the final moments of your boot’s life. Modern turbocharged engines are making anywhere from 10 psi to 30 psi in stock form. Adding just a few pounds of boost will make a significant impact on the holding power of your boots. It should also be noted that we have several diesel customers running boost pressure at over 100 psi.
Pressure is certainly something to consider when selecting boots for your build. High pressure has a way of finding any path of airflow and changing a pinhole leak into a fully torn boot. Although rubber is normally fairly resilient to pressure, degraded rubber certainly is not. Check the section below for more information on boot materials and improving the pressure tolerances of the boots in your system.
Cleaning your CAC system
When maintaining your CAC system or removing any components, it makes sense to give them a thorough cleaning while they are off the vehicle. There are many different product options, but the safest method uses simple dish soap and water. A brush can also be used to clear out the internal piping. The boots and couplers can be soaked and cleaned as well.
To clean the intercooler, you can cap one end of the cooler, fill it with soapy water, and slosh it around to remove as much oil residue as possible. This can be done multiple times until the drained fluid is clean. Other fluids such as acetone and gasoline would be just as effective, but by far the safest method is to use simple dish soap. The external fins also need to be cleaned of dirt, bugs, road debris, and general crud. Remember, these fins use passing airflow to transfer heat from the internal air. If they are clogged, they lose their efficiency. Spray these areas with low-pressure water to avoid damaging or bending the fins. A very light brushing can also help remove stubborn debris in the intercooler core.

External intercooler dirt and debris

External intercooler dirt and debris
External intercooler dirt and debris
The internal passages must dry completely before being reinstalled. Water entry into the combustion chamber is not something you want, trust me.
These processes are very simple and fairly quick to complete. Once finished, adding a catch can to your system would be an easy way to keep future buildup from accumulating.
Boot Blowouts
A boot blowout will often happen during one of the first few drives of a new build, when you realize that a clamp is not fully tightened. You’ll hear an audible alert when one of the connection points is no longer intact. If you are lucky, the boot may have just separated from the pipe. You can then check for any issues, clean the surfaces, and reinstall the boot.
Otherwise, you are likely facing a boot that has torn or ruptured, requiring replacement. Although you may be able to get your vehicle off the road, most of the time you will experience serious drivability concerns. When this happens, you will wish you had checked your system and upgraded your boots! The cost is minimal compared to your peace of mind and improvement in reliability. A blown boot will result in a rich A/F mixture, potentially fouling the plugs (if the vehicle is gasoline powered) and causing other concerns. The best thing to do in this situation is to get the vehicle safely off the road and attempt to replace the boot before driving any appreciable distance.
Now, let’s take a look at a way to improve the reliability of the boots.
Upgrading Boot Material

Mishimoto (left) and Ford factory boot (right)
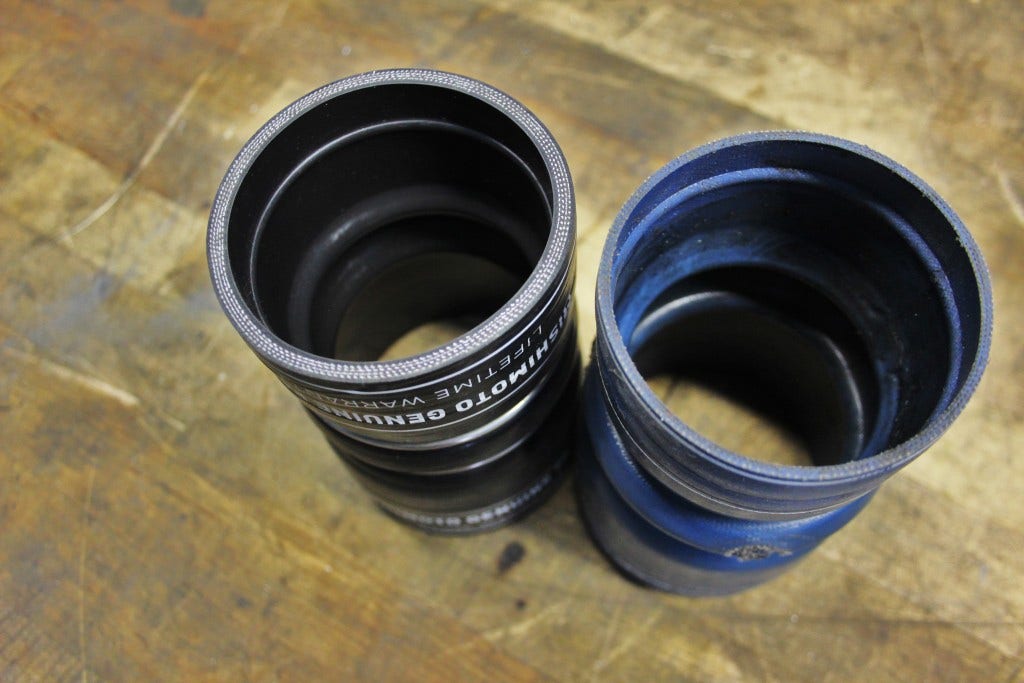
Mishimoto (left) and Ford factory boot (right)
These two images portray the differences between a stock boot and the Mishimoto boot. Our five-layer silicone construction provides a huge improvement in rigidity and strength. The wall thickness of the stock boot is around 2mm, while the Mishimoto boot measures in at 5mm, a 250% size increase. Once you handle both these boots, you can feel the difference. The stock boot squishes quite easily with little pressure, while the Mishimoto boot provides greater resistance.
Silicone
Upgrading to a silicone intercooler boot is a fantastic way to improve the reliability and longevity of your CAC system. In fact, some manufacturers are beginning to see the value in equipping their vehicles with silicone couplers. For the most part, the greater the ply-count, the more robust the coupler will be. Mishimoto offers its factory-fit replacement boot kits with five layers of silicone. Our goal is to design our boots with the worst-case pressure and temperature situations in mind. If you can build it, we want to support it.
So what makes silicone better? Silicone is more resilient to oil and fuel byproducts. This benefit alone is reason enough to upgrade your boots. Additionally, silicone has a much higher temperature tolerance. Silicone products retain their integrity within the temperature range of -50°F (-45°C) all the way up to over 400°F (204°C). If your intercooler system is seeing temperatures this high, you have much bigger problems than a boot concern.
Duracore ™
Duracore™ is a fluoroelastomer-based material that comprises the inner layer of Mishimoto boots. This layer will make direct contact with the air and any contaminants within your CAC system, so the material’s properties are quite important. Duracore™ is far more resistant to petroleum-based chemicals, so it is nearly unaffected by the byproducts in your system. This means you will have virtually zero breakdown of the coupler, resulting in a boot that will last the lifetime of your vehicle. Duracore™ also provides greater pressure tolerance compared to basic silicone. As we mentioned earlier, several of our customers are using our boots in extremely high-pressure systems (100+ psi) without any issues.
Mishimoto is so confident in the performance of our boots, we offer a lifetime warranty. Are we challenging you to attempt to blow one of our boots? Maybe. Certainly send us an image if you can manage it! If you want absolutely the best product for your vehicle, and the last coupler you will ever buy, be sure Duracore™ is present in the construction.
In short, if you are still using EPDM rubber boots, do yourself and your vehicle a favor by upgrading to a silicone counterpart. You can thank us later!
Clamp It
So now that you have your pipe and couplers cleaned and ready for installation, it is time to pick an appropriate clamp for your application. We have three options for intercooler piping.

Different clamp types: worm-gear clamp (left), T-bolt clamp (middle), and constant-tension clamp (right)
Worm-Gear Clamp
These clamps are commonly installed on cooling system hoses, which have less pressure than a standard CAC system. They are about as inexpensive as you will find. If you are in a pinch or low on funds, a worm-gear clamp is likely to support your system just fine. These clamps would be considered a “good enough” solution.
The inner portion of a worm-gear clamp has slots for a gear to pull the clamp tight. These slots are notorious for digging into rubber and silicone, causing damage. Another important thing to consider is clamping area. Worm-gear clamps are generally thinner than other clamp options, meaning the force exerted on the pipe is spread over a smaller area, which is less effective. Another downside is the potential for loosening. Because of the design, clamps can loosen after repetitive pressure oscillations, which can result in separation of a boot from the pipe. For constant clamping pressure, the options below are much more effective.
T-Bolt Clamp
The T-bolt clamp is primarily what you see on modern CAC systems. This clamp provides a cleaner appearance and is more effective at holding greater pressures because of its band width. A wider band creates a larger clamping area for a better seal and grab. Additionally, the T-bolt clamp utilizes a bolt and nylon lock nut to ensure that the clamp pressure does not loosen over time. This is a key benefit for pressurized intercooler systems.
Clamp size is important. With a worm-gear clamp, you can use a larger clamp and tighten it enough to fit a smaller-size tube. T-bolt clamps, however, are designed to fit only a small variance in tube diameter. Pay close attention to the specs of the clamp you are purchasing to ensure that it will fit properly with your setup.
Constant-Tension T-Bolt Clamp
The constant-tension clamp, a modification of the standard T-bolt clamp, uses a spring to provide a constant pressure on the surface. This allows the clamp to compensate for any expansion of the hose from temperature or pressure variations. These clamps require a specific installation process to ensure appropriate torque is placed on the nut, allowing for ideal operation of the tensioning portion of the clamp. Mishimoto includes these clamp types with all our diesel boot, piping, and intercooler kits to ensure the best possible seal.
Clamp Location
Some confusion exists around clamp location on the boot or pipe. This is easily settled with an image showing the right and wrong way to mount the clamp.

Correct clamp installation
As you can see, the clamp is not installed on the actual bead roll of the pipe, but rather on the outside portion of the bead where it can make a nice seal with the flat surface. The bead then provides a ridge for slip resistance. This is a correct installation.

Incorrect clamp installation
The incorrect installation above shows the clamp directly on the bead. The seal is not good, and there is no provision for slip resistance. Use the images above to guide your installation, and you should not have any issues!
The Latest Quick-Disconnect Connections
Several new turbocharged vehicles use quick-disconnect fittings on the intercooler and charge pipes. Although some couplers are still used as flex joints, many CAC connections are now constructed from plastic snap-on housings secured by metal clips. The fittings use internal O-rings to provide an airtight seal for the pipe and heat exchanger. It is hard to argue with the logic behind these new designs. Servicing these units is quicker, cost of parts is similar, and if a seal fails, the O-ring becomes a replaceable component. These connection points provide an audible click when properly seated, which eliminates the need to torque a clamp or properly seat a hose.

Plastic quick-disconnect intercooler pipe
The connection point, however, is still manufactured from a plastic material. Plastic components exposed to the heat and pressure from a CAC system will likely degrade and eventually fail. This is especially common with modified examples. Mishimoto is tackling this issue in the form of CNC-machined aluminum quick-disconnect fittings that we are developing and manufacturing to replace the plastic counterparts. The first unit we released with such a design is our 2011+ Ford 6.7L Powerstroke cold-side intercooler pipe kit.

Mishimoto CNC-machined intercooler pipe fittings
Keep an eye out for more of these components to be developed and offered by the team at Mishimoto!
Install Practices
Boot installation will vary significantly from one vehicle to the next, but on a pipe it remains nearly identical. Following the basic guide below should help you get those new boots on and keep them on!
- Remove your existing boot
Removing your existing boot should be a fairly simple process. First, loosen the clamps securing the boot to both ends of the connection. Once complete, pull the tube to separate the boot. A pick tool may be necessary if the boot seems stuck to either surface. If you were unfortunate enough to have suffered a boot rupture, the vehicle may have done most of this work for you!
- Clean the sealing surface
Cleaning the surface of your boot connection is vital to ensure that the new boot stays firmly planted in its new home. Take the appropriate measures and use a solvent to properly remove all oil from the surface of the pipe. Be sure all solvents have evaporated before installing your new boot.
If you wish to take this further, cleaning the entire CAC system is possible with the use of common dish soap. The process is outlined above! Once the system is complete, we recommend installing a catch can to ensure that the system remains clean.
- Select the appropriate clamps and slide them onto the pipe
Use the guide in this article to select the appropriate clamps for your needs. Ensure that the correct size is being used (especially with the T-bolt units). Once you have your clamps in hand, loosen and slide them onto the pipe.
- Slide the new boot into position
This is normally the easy part! Slide your new boot onto the connection points, making sure that the coupler is seated as described earlier in this article. If you are having issues with getting the coupler onto the pipe, use some dish soap or hairspray to temporarily lubricate the surface for easy installation.
- Tighten the clamps
Install the clamps and torque them to the manufacturer’s specs. Be sure not to over tighten these as you could distort the piping (if aluminum) or damage the clamp itself.
- Road test the vehicle to ensure the boot is secure
This is the fun part! Once the boot is completely installed and you have verified that all clamps are properly tightened, an appropriate test drive is necessary to ensure you have a functioning system. Be sure to get into high boost once the vehicle is warm, to make certain all connections are properly secured.
Summary
We hope this article has provided you with some helpful information about boot selection and installation. If you are in need of some new boots, a catch can, or any performance cooling products, be sure to stop by our site (Mishimoto.com) and check out our products! Keep an eye on our blog for more informative articles on vehicle maintenance, component replacement, and product build threads.
Engineering.mishimoto.com
Thanks for reading!